Check it out. Spotlighting Technique. A very easy technique that you can use with just about any stamp set, especially the really detailed (in other words, busy) stamps.
The first idea I shared at my Card Club at my Church. We Have Bible class the first half and the second half we make cards for Members of our Church-Shut ins, sick, Military, as well as Anniversary, and With Sympathy.
This idea delighted the ladies that created this card. This idea is using the Spotlighting Technique where you take one spot or more on a Neutral stamped card and "spotlight" the one area in a color on a smaller piece of paper. Sometimes you can use this on a very detailed stamp but in this case I am using a simple design. I love how this turned out:

Of course I have to have special Homemade Envelopes due to the size (card is 4.75" X 4.75") and I used our Amazing Tool-The Envelope Punch board Tool #133774 $19.95.

Supplies I used:
Stamps: Serene Silhouettes (w) #132073 $24.95, (c) #127324 $17.95 This is one of my "Go To" sets for all purpose stamping. Just pick a greeting.
Four You: (w) 130535 $14.95, (c) 130538 $11.95.
Ink: Early Espresso # $5.95, Island indigo #126986 $5.95
Paper: Whisper White #100730 $8.50 (40 Sheets), Island Indigo #122923 $6.95, Early Espresso #119686 $6.95. I also used Retired In Color pattern of Island Indigo DSP but we do Have the Current DSP with this color -Regals Color Collection DSP Paper Stack #130139 $21.95.
Etc: Retired – Island indigo Ribbon (Possibly in the Clearance Rack)
Here is a Picture Tutorial of this Fun idea:
1. Stamp image on your paper. I used Staz-On Black on Whisper White and layered onto Basic Gray. Then I rounded two edges-opposite sides-looks good.

2. Stamp image again on separate White Cardstock.

3. You will watercolor image using Blender pens and the ink on lids (I give my ink pads a little squeeze and it leaves behind a bit of ink). As you can see-well used.

4. I colored in the stamped image with Gumball Green and Summer Starfruit.

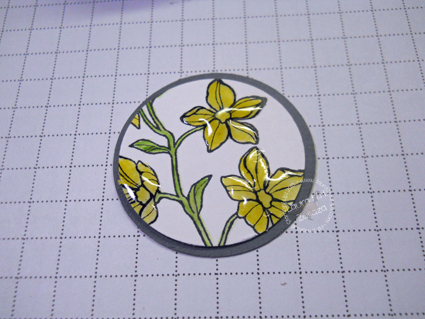
5. Now-Punch out with whatever shape you like. I used circle shaped punches for this card:

6. Add a bit of high shine-using Crystal Effects.

7. Punch out the Gray Cardstock with the larger sized punch.

8. After about a 10-15 Min dry time-pick up and glue on top of the Basic Gray Circle.
9. Place on top of your original stamped image.

10. Place on top of card, add greeting and Ta Da!
 I used New Stamp set-Peaceful Petals (w) #133104 $28.95, (c) #133107 $20.95, Primrose Petals (#126841 $6.95) as the base Cardstock-Pretty Pretty!
Now you try this fun idea with your supplies.
Something New: A New Personalized stamp

Just click on the picture.
Of course-Sale-A-Bration!!! FREE Stuff People!

And:
My Online Stamp Club-Sign up by the 10th of the Month and get stamps and ideas delivered to your door. Perfect if you are not able to come to my classes, or not able to have a stamp party/Workshop in your home. Click here to read all about it.
This month we are focusing on the Chalk Talk set and the Framelits-You can add on the Framelits with your order-Just contact me today.

Enjoy!

Leave a Reply